
HOLA everyone!
Hope you all are doing well! It's been quite a few days since I posted my last DIY project and since then I have been getting some really good response regarding my posts and ideas! If you are reading this post right now, please take out a few minutes and let me know what you think about my blog and what would you like to see!
Okay enough of the boring talks. Coming to today's post! I recently went to a local craft store and spotted some really cute rubber stamps. But since they were imported, the people at the store had priced them as if they were blindfolded while sticking the price labels. Literally. -_-
So as usual, I decided to come up with a really inexpensive stamp idea that ANYONE can easily implement!
Believe me, it can't get easier than this! ;)
So here are the things you'll need:


So I hope you enjoyed this post! Please leave a comment below and let me know your views!
For all the projects you do, make sure you tag them #thediyfactory on Instagram. I love to see what you guys do!
Until next time, toodles!
Hope you all are doing well! It's been quite a few days since I posted my last DIY project and since then I have been getting some really good response regarding my posts and ideas! If you are reading this post right now, please take out a few minutes and let me know what you think about my blog and what would you like to see!
Okay enough of the boring talks. Coming to today's post! I recently went to a local craft store and spotted some really cute rubber stamps. But since they were imported, the people at the store had priced them as if they were blindfolded while sticking the price labels. Literally. -_-
So as usual, I decided to come up with a really inexpensive stamp idea that ANYONE can easily implement!
Believe me, it can't get easier than this! ;)
So here are the things you'll need:
- Erasers (the biggest you can find)
- Carving tools (the ones I used were actually fruit carving tools. LOL. You can even do the carving bit with a blade or a blunt knife)
- Pencil
- Stamp pad or color bar

Let the carving begin!
Step uno: Start drawing your design on the eraser. My favorite was the moustache stamp that I had seen at the store so I chose to recreate that :D

 |
| I am a moustache lover. |
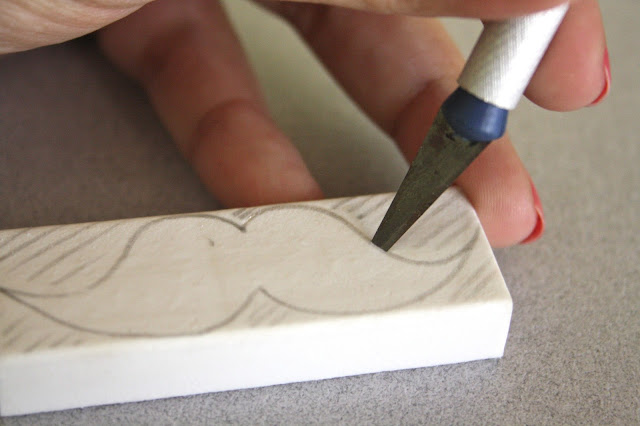
Step dos: Carefully start outlining the moustache lines with your carving tools. Make sure that the cuts aren't too deep nor too shallow.

Step tres: Once that's done, carefully cut the sides of the eraser and scrape off the area around your design.

Step cuatro: Scrape off everything around the design so that when you stamp it, the surrounding area doesn't interfere with your pattern.

 |
| Done done done! |
Step cinco: Now just dab the stamp onto the stamp pad or spread some color onto the stamp and just keep stampin', just keep stampiiin' stampiiiin' (read it in Dory's voice)!
Once again, you have your very own DIY stamp ready in just 5 steps! *yaay*
 |
| Yellow muchhi? Really? |
Try out some other patterns maybe?

 |
| I expected the second to turn out much better than THAT, haha. |
So I hope you enjoyed this post! Please leave a comment below and let me know your views!
For all the projects you do, make sure you tag them #thediyfactory on Instagram. I love to see what you guys do!
Until next time, toodles!
~ Shivani ~