Friday, 2 September 2016

Hello September!

Hey y'all. A blog post after a year. How regular is that! *rolls eyes at self*

I don't have a DIY post for you all, unfortunately, but since the last few months I have become an amateur designer and have been trying my hand at illustrations!

Hence, let me begin my birthday month with a freebie!

Oh September, please be nice! <3


Click on the links below to download!

Desktop wallpaper: http://bit.ly/2bH8rPB
Phone wallpaper: http://bit.ly/2cv8xuU

Enjoy!

Lots of love
~ Shivani ~

Sunday, 6 September 2015

Mail a slice!

You little stud, yes you! HELLO!

Am back with another amazing blog post in just two months. Is this really happening? 
Let me take a moment to tell you how amazing it feels to take a year off for myself. I am enjoying every bit of it, truly! I managed three trips right from Kerala to Ladakh in a matter of two months. From the tropical, coconut-clad Kerala to the arid, snowy Ladakh the journey so far has been brilliant. I cannot believe it's already been four months since I returned from Baroda. I feel happy and sad at the same time.

Okay, before your cursor moves to the X button of this tab, let me tell you that this is not turning into another 'I-want-to-share-my-views-and-emotions-with-you' blog. No offence to the ones who do that by the way. :D

SOOO, since my birthday is coming up in three weeks, I decided to do something for the blog that brings together the things I love. That obviously includes two things. Food and postcards. I also have a major announcement to make but you'll find that at the end of this post!

Coming to the point, have you ever thought 'I wish I could mail you a slice of my birthday cake! It was so delicious, too bad you missed it!'? Well guess what, NOW YOU CAN! Imagine how amazing it would be to check your mailbox and pull out a slice of cake! Making this delish darling takes only 15 minutes. Easy peasy. Let's begin!

Yes, I addressed it to Ranveer Singh. 

These are the things you'll require:


Now that acrylic caulk that you see there is something that is actually quite easy to find but you'll only have to figure how to not say 'Bhaiyya, aap ke pass caulk hai?' when you go to a hardware store. Ask for a silicone sealant. I bought the one manufactured by M-seal and a small tube costs nothing more than Rs. 50 (around 1$). One slice of cake generally uses up one tube.

Depending on the flavour of the cake, pick your acrylic colours. I chose red velvet (my favourite!) so I made a mixture of brown with a tinge of crimson.

Step 1:
Start by taking the foam you have bought and decide how big you want your slice to be. Depending on that, with a marker, outline the pattern of the slice.
I wanted a huge slice so I outlined it accordingly.
I like big slices and I cannot lie. *ahem*


Step 2:
Take a cutter and start cutting along the lines like you are sawing it. Make sure the blade is sharp otherwise you'll end up with serrated cuts. You don't want your slice to look like your cat nibbled on it now, do you?

That doesn't look like sawing action. :|

Once that is done, cut out a neat little portion of the foam right in the centre of the side. That's where some of the buttercream will go in. :) We are fancy, hence we make a layered cake.


I know I said 'neat cuts'. I blame it on my imaginary cat. She nibbled on it. 

Step 3:
Depending on the flavour of your choice, get your palette out and mix up some acrylic shades yo. You can get deep brown for chocolate, lemon yellow with white for a lemon cake, light pink for strawberry and so on. 

Mix it up!


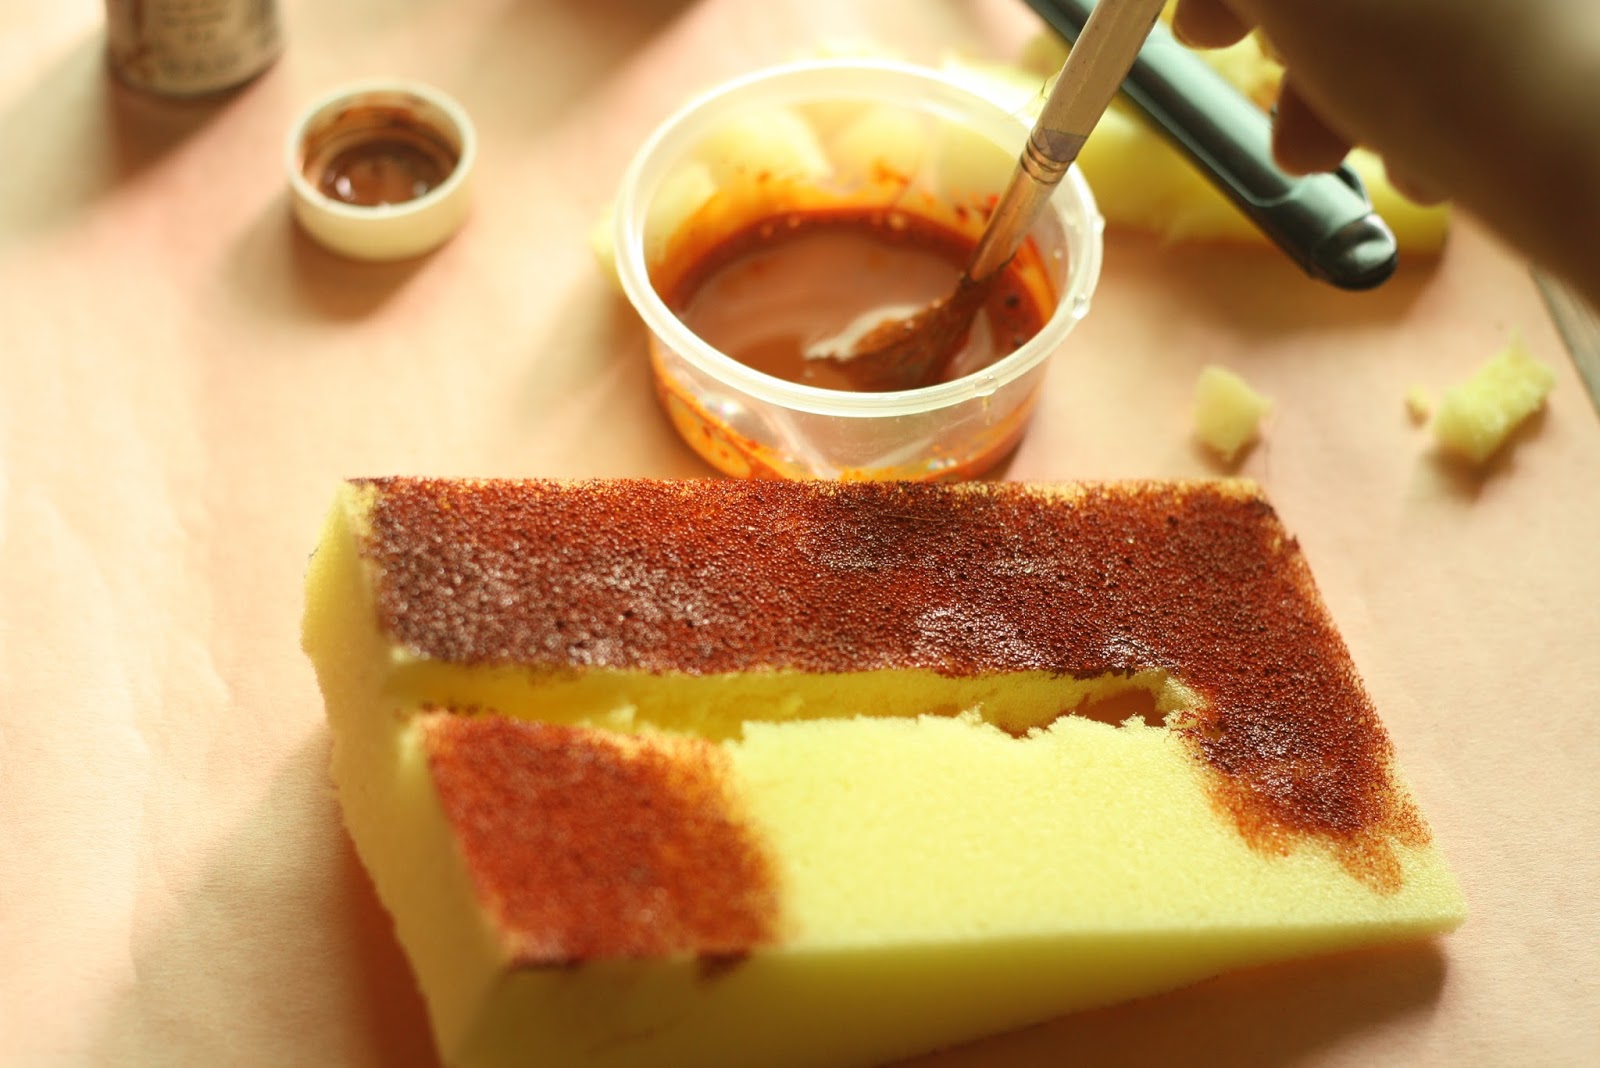
Make sure you coat all the sides well. Use generous amounts of paint, okay?

That piece of cake screams SHABBY.

Step 4:
It's time for the frosting! The caulk is pretty easy to work with but you have to be quick with the spreading and texturing since it tends to get sticky in a minute or so. If you have the patience, create intricate patterns on the edge of the pastry or just go with the conventional messy frosting look. I couldn't show you a step-by-step illustration since I had to work fast. As you know, I make things and click pictures of them at the same time. Wuddup multitasking?! B-)

The caulk does wonders. Haha :P

The finished product will look something like this. Try not to eat it, please?


YUM.

Step 5:
Cut out a piece of card paper that is measured according to the side of the slice. Start this step ONLY after the caulk and paint have dried. That will take about 6-7 hours. Using regular glue, paste the card paper on one side of the slice. Leave it aside to dry overnight.


Step 6:
Draw on it, write something or just doodle a man. Use it as your postcard and don't forget to leave some space for stamps.
Since the slice is going to be light, you won't need stamps that are worth more than 30 Rs. The Post Office guys can be a little finicky and will say that you can't post such things, but as long as it has an address on it, it will go. Hopefully.


So there you go! Your mailable slice of cake is ready! Looks delectable, doesn't it?  Go ahead and check out whom I addressed mine to. Yes, you may LOL at my cheesy attempt. :P

Ranveer forever. *squeals like a sixteen year old girl*


I also made a GIF to give you guys a 360-degree view of the slice. It looks so cool this way!


Try it out and make someone happy on your birthday! Give your loved ones a surprise instead! Okay now scroll down. I have something important to tell y'all!

* a n n o u n c e m e n t *
Thank you so much for stopping by and reading my blog and all the silly posts I put up! I recently took a decision of moving to WordPress and am in the process of shifting all my posts there soon. I will of course notify you when it's time to say adios to Blogspot! I hope the transition is smooth. I will continue being silly even there. I promise. ;)


Lots of love

~ Shivani ~

Wednesday, 8 July 2015

DIY Wanderlust Phone Cover


Yow! How are y'all? Am so happy to post this DIY after a really long time (as usual)! I completed my postgraduation in Biotechnology and am back to Bombay for good. I have decided to take a year off in order to do all possible things that I have missed out on, because of my tedious lab hours during the last five years. Hence, this break year will be dedicated to food, travel, DIY and photography not necessarily in the order I mentioned. I assume it'll help me grow as a person and help me unwind a little. :)

Psst! I hope you haven't fallen asleep.

So since I have 365 days of absolute freedom, I will hopefully be inspirated to post more, craft more and share more with all you amazing people.


Today I decided to make something pretty rad. I saw something similar online and thought of making my own version of it. Phone covers generally have graphic designs on them so my idea was to replace those graphics with actual stamps. I present to you *ba dum tsss* the Wanderlust Phone Cover!


As always, run to your stationery work station and pick up the following. You may have to run to the mobile accessories store for one thing. :P


I've put an asterisk on stamps, as you must have noticed. I realize that not many of you are philatelists and hence, may not have interesting stamps to compile for this project. Feel free to send me a message in case you want some interesting stamps for your cover. You can give me a cupcake in return. That's all I ask for. *wink wink*

If you ARE a philatelist like me, congratulations! Go through all those stamps you had kept aside for trade and pick the most colorful and interesting stamps for this project. Try and avoid portraits or illustrations of people. 


Let's begin!

Step 1:
Start by taking a sheet of OHP. In case you are not able to get transparencies, use any card stock or card paper. It won't be as flexible as an OHP but will act as a good substitute.
According to the inner dimensions of the phone cover, outline a rough piece of paper. Later, use this as a stencil to correctly cut your transparency.


This is the rough piece of paper cut exactly according to the inner
dimensions of the phone cover.

Use the paper to cut the OHP sheet.

Yes, am good at multitasking. Cutting the OHP and
and taking a picture! Owwww SNAP! :D

Step 2:
Place the cut OHP inside the phone cover and mark the areas around the camera/flash/speaker. Cut them out, of course. :P


Don't worry about any stray marks on the OHP. They'll get covered eventually.


Step 3:
Decide an arrangement for your stamps. Place them strategically. This is important. No, really! Placing your stamps randomly v/s placing your stamps in an organized chaos does make a difference! Try it out for yourself!


Step 4:
Stare at the arrangement and doubt your sense of placement. 

Step 5:
Rearrange.

Step 6:
Repeat steps 4 to 6 till you're happy with the outcome. You may now paste the stamps! Haha.


The final product would make you want to doubt your crafting abilities. If you have stamps sticking out
from out sides, CONGRATULATIONS! You have done a good job!


Step 7:
Cut all the extra protruding stamp edges and make the OHP look neat. 


Step 8:
Cut out the stamps covering the camera/flash/speaker. Once that's done, push the ready OHP into the phone cover and place properly. Not that I need to tell you that, but I made a GIF for that. Gotta draw some attention towards it, okay? :P


VOILA!

Your phone cover is ready. Looks amazing, doesn't it? You can personalize it however you want! Use pictures, memes or even a to-do list. Okay, the last point was lame. Ignore.

Here is how mine looked.


Japan, USA, Iran, I have them all in here!

I hope you enjoy making this quirky phone cover. Go ahead, show it off! Post a picture of it on Instagram and tag it with #TheDIYFactory. I'll definitely keep an eye out for your posts!
Lastly, don't forget to follow me on Instagram @shivaniparasnis because you know am cool. JK. I post good stuff sometimes! :D

Sending lots of love your way! 


~ Shivani ~

Wednesday, 12 November 2014

Jot that thought!

નમસ્તે from the land of dhoklas and khaman!

I know, I was supposed to upload this eons ago. Sorry for the delay!
Here, have a cupcake. :*


Today's DIY is going to be something that you need every single day. At least I do.
A to-do booklet that fits practically anywhere in my bag. And what is better than making your own?


So go to your room, pick up these goods from your stationery work station and come back.


Let the crafting begin. *ta daaa*


Step 1:
Start by picking some pretty paper that you've been meaning to use for something amazing. Now's the time! Make sure it's thicker than the ruled paper you'll be using later.


Cut the paper according to the size of the booklet you want to make.


Fold the cut paper such that you get a little cover-like thing for your book.


Take a set of ruled papers and cut them according to the size of the outer cover you just prepped. Make sure that your ruled papers are around 0.5cm lesser in width than the cover of the booklet.


Now fold the cover and the ruled papers along the fold you had made earlier on the cover paper.

Wait, I was telling you everything in steps. I lost count. Teehee.


Step 2:
Binding the papers together using this simple trick is something I learnt when I was in grade 5, at a local art workshop. I realize its use now!

Pick up any eraser that you find lying around your house and place it under the opened booklet, along the spine. Also, pin up all your papers to keep them together!

Oh and open up the stapler like you do when you refill the pins!


Now place the stapler facing downwards on the point on the spine where you want to staple the pages together. One on the top and one at the bottom is generally 'nuff.

Punch punch punch!


Flip it over and take off the eraser. LOL. It's stuck to the pins now. Use a scale-like device to fold the pins inwards like a stapler would usually do.


And if you wish to add a little pocket to any of your booklets, just leave this additional flap while cutting your cover paper. See the picture below. Cut along the orange line and put some glue along the yellow line and simply fold it up!


Voila!


For some beautiful little add-ons, here are some self-explanatory images. Check check! You'll love them!


Beautiful, beautiful washi tape!


This little one is as small as my credit card!


So after all those miscounted steps, you finally have your adorable to-do notebook!

Check out the others I made.


Don't you love them?

Do you feel like making your own? Yes? Yes? Then yaaay! Make them and upload them on Instagram with the hashtag #theDIYfactory! Why? Because I love to see what you lovelies do!
Also, don't forget to follow me @shivaniparasnis. I post cool pictures, you know? ;)

Let me know what you think about this post! If there is anything you would like me to make, post it in the comments below! 


Sending lots of love your way!

Adios, mis amigos.


~ Shivani ~